Toolbox for camera – self calibration
11. September, 2009, Autor článku: Noskovičová Lucia, Elektrotechnika, Študentské práce
Ročník 2, číslo 9  Pridať príspevok
 Camera calibration is necessary step in 3D vision systems. Various methods for camera calibration can be found from the literature. The main interest has been in model fitting, although the other stages are also important. The camera calibration is proposed in this paper which is based on a camera self-calibration using a camera calibration toolbox for Matlab. In photogrammetric metrology, images of the targets originate from photographs and CCD cameras. The camera self-calibration based on image correspondence from the images obtained in the CCD camera. The problem of finding the intrinsic parameters of a camera is important for practical applications.
Introduction
Camera calibration is an important task in computer vision and robotics systems. Geometric camera calibration is concerned with the problem of determining the accurate mapping between the three-dimensional coordinates of viewed points and the two-dimensional coordinates of the corresponding points in an image sensor. A camera model consists of parameters that define this mapping. They often are divided into extrinsic parameters, which depend upon the pose of the camera as a whole, and intrinsic parameters, which depend upon the internal nature of the lens and sensor.
Camera model
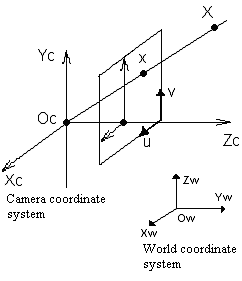
In the literature various methods for camera calibration can be found. Most of these methods use a pinhole camera model. A pinhole camera model is using in most of camera calibration methods. The pinhole model is an approximation suitable one for many computer vision applications. The pinhole camera model is based on the principle of colinearity, where each point in the object space is projected by a straight line through the projection center into the image plane.

Fig. 1 The pinhole camera model
Model (Fig.1) describes the transformation from world coordinate system (X, Y, Z) to ideal camera image coordinate (x, y). The camera performs a linear transformation from the 3D projective space to the 2D projective space. The projection is carried by an optical ray reflected from a scene point X or originating from a light source. The optical ray passes through the optical center C and hits the image plane at the projected point u. The projective transformation in general case can be factorized into three simpler transformations corresponding to the three transitions between these four different coordinate systems. The pinhole camera projection is specifying in full generality. We already know that it is a linear transformation from the 3D projective space to the 2D projective space. The transformation is the product of the three factors
| (1) |
where X is point expressed in the world coordinate system, R is a rotation matrix that it expresses three elementary rotations of the coordinate axes- rotations along the axes X, Y, and Z. The translation vector t gives three elements of the translation of the origin of the world coordinate system with respect to the camera coordinate system. Thus there are six extrinsic camera parameters. K is upper triangular and expresses the mapping 2D 2D which is a special case of the affine transformation. K is called the intrinsic calibration matrix.
| (2) |
The intrinsic calibration matrix parameters are as follows: u0 and v0 are coordinates of principial point, f gives scaling along the u axis and g gives the scaling along the v axis. Both values are identical to the focal distance, f = g. The parameter s indicates the degree of shear of the coordination axis in the plane of the image. It is, that the v axes of the image affine coordinate systems co-incident with the vi axis of Euclidean image coordinate system. The value s shows how far the u axis is slanted in the direction of axis v. The shear parameter s is introduced in practice to cope with distortions caused by, e.g., placing a photosensitive chip off-perpendicular to the optical axis during camera assembly. (Heikkilä, et al., 1997; Hartley, and Zisserman, 2000; Šonka, et al., 2006)
Lens distortions
Several types of lens distortion exist, however, radial distortion is usually toughest part of the global lens distortion, especially if inexpensive wide-angle lenses are used. There are two main types of radial distortion. When image points to get displaced from its desired location in the position closer to the optical axis (negative displacement), there is a barrel distortion. Alternatively, the image points can be put in position to move further from the optical axis (positive displacement), in this case pinchusion distortion occurs. Barrel distortion is wide angle lenses, and therefore dominated by disturbance-related research, which is considered as computer vision.
Camera model including distortion
Mathematically, the camera model including the lens distortion is expressed as:
| (3) |
ui expressed the new normalized point coordinate, uc expressed camera point coordinate, dx is the tangential distortion vector and the 5-vector kc contains both radial (k1, k2, k3) and tangential (k4, k5) distortion coefficients. (Bouguet; Heikkilä, and Silvén, 1997)
Camera calibration
Camera calibration is a necessary step in 3D computer vision in order to extract metric information from 2D images. Much work has been done, starting in the photogrammetry community and, more recently, in computer vision. According to the methods, we can classify those techniques roughly into two main categories. First are photogrammetric camera calibration methods which using calibration objects whose geometry is known. Second are camera self-calibration methods which using the information from the scene. Other techniques exist: vanishing points for orthogonal directions and calibration from pure rotation.
Photogrammetric camera calibration
Traditional camera calibration methods require a calibration object with a fixed 3-D geometry. The geometry of the object in 3-D space is known with very good precision. Calibration can be done very efficiently. The calibration object usually consists of two or three planes orthogonal to each other. Sometimes, a plane undergoing a precisely known translation is also used. Many applications use a planar pattern shown at a few different orientations. The knowledge of the plane motion is not necessary. Because almost anyone can make such a calibration pattern by him/herself, the setup is easier for camera calibration. The most popular calibration object is chess board. These approaches require an expensive calibration apparatus, and an elaborate setup. (Zhang, 1998; Zhegyou, 2004)
Camera self – calibration
Another branch of study, referred to as self-calibration. Techniques in this category do not use any calibration object and can be considered as 0D approach because only image point correspondences are required. Although no calibration objects are necessary, a large number of parameters need to be estimated, resulting in a much harder mathematical problem. Just by moving a camera in a static scene, the rigidity of the scene provides in general two constraints on the cameras’ internal parameters from one camera displacement by using image information alone. Therefore, if images are taken by the same camera with fixed internal parameters, correspondences between three images are sufficient to recover both the internal and external parameters which allow us to reconstruct 3-D structure up to a similarity. While this approach is very flexible, it is not yet mature. Because there are many parameters to estimate, we cannot always obtain reliable results. (Zhang, 1998; Zhegyou, 2004)
Solutions for the camera calibration
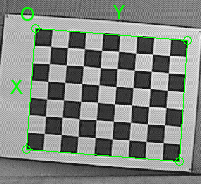
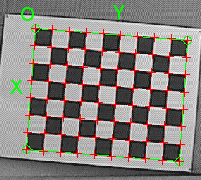
In this section we will explain camera calibration toolbox for Matlab. This toolbox downloaded from internet with free license obtained a standard functions used for the camera calibration process. The toolbox is based on the camera self-calibration. The calibration object and CCD camera has to be used for the calibration process. In our laboratory was used Mitsubishi colour CCD camera 400-EW and the chess board as the calibration object. The calibration object was picture which composite of 7 x 9 squares with 29mm diameter. From the object calibration we obtained all corners points coordinate. These point coordinates were input data for calibration algorithms. The proposed technique only requires the camera to observe a planar pattern (chess board) shown at a few different orientations. The pattern can be printed on a laser printer and attached to a “reasonable” planar surface. Either the camera or the planar pattern can be moved by hand. The motion and pattern parameters need not be known. The proposed approach lies between the photogrammetric calibration and self-calibration.
The corner extraction
The corner extraction is the first step in the camera calibration process, see Fig.2. The coordinates of the all corners point was used during the calibration. The program computes the intrinsic and the extrinsic parameters from this coordinates. The corner extraction engine includes an automatic mechanism for counting the number of squares in the table. This tool is particularly beneficial when working with large amounts of files, because the user need not manually enter the number of squares in both directions x and y in the pattern. On some very rare cases, however, this code can not predict the right number of squares. This would happen when the lens typically calibrated with extreme distortion. At this point in the corner extraction procedure, the program provides the opportunity for users to turn off the automatic square made code. In this special mode, the user will be asked to calculate the square for each image.
Data acquisition
To obtain measures, the operator may process as following:
- At first, the operator gets used to the experience by taking a few images of the object and measuring the parameters with the calibration software
- With the calibration software, the operator obtained the corner point coordinates
- Then, the corner point coordinates are the input for the camera calibration. The program finds automatically the image point correspondences and then the intrinsic camera parameters computes from these data
- The Dircet Linear Transformation is used for computes the first intrinsic parameters. Then, the result is uses as the input for nonlinear optimalization (Bouguet)
Results
The images form CCD camera was used for the experiments. The result from toolbox is summarized in the table 1. In this case were used 21 images. The image number 3 contained a noise. This image caused a difference between the image point correspondences and that caused bigger the pixel error than 1 pixel. The result in the table 2 is without the noise image and the pixel error is less than 1 pixel.
| focal length | f | 3176.63249 ± 383.40891 |
|---|---|---|
| g | 3185.77481 ± 375.24027 | |
| principal point | u0 | 444.83943 ± 38.10251 |
| v0 | 262.33739 ± 13.83138 | |
| pixel error | 1.68169 | 1.53117 | distortion | kc |
5.44 ± 2.18 -454.69 ± 270.83848 0.047± 0.0196 -0.0121± 0.061 0±0 |
Tab.1 Result from camera calibration (21 images)
| focal length | f | 894.36879 ± 11.55674 |
|---|---|---|
| g | 899.33990 ± 11.51077 | |
| principal point | u0 | 392.76184 ± 5.91256 |
| v0 | 276.11257 ± 4.82010 | |
| pixel error | 0.24510 | 0.21358 | distortion | kc |
-0.323 ± 0.02 0.613 ± 0.162 -0.0046± 0.00096 0.0001± 0.001 0±0 |
Tab.2 Result from camera calibration (20 images)
Conclusion
We have presented an algorithm for the estimation the intrinsic camera parameters and the lens distortion. The proposed method has been tested on images obtained in CCD camera. The main advantages over other algorithms are that its initialization is easy and needs no a priori knowledge about camera and pattern. However, the experiments in the last section showed that the algorithm is very sensitive to the noise in the input images. In some case the toolbox can no be used. The conclusion is that the toolbox is suitable for the standard purposes for the images withot noise.
In the future we aim at improvement some methods used in the toolbox. This improvement will rests in optimalization and efficiency of the algorithms.
References
- Hartley, R.; Zisserman, A.: (2000) Multiple View geometry in Computer Vision. United Kingdom, Cambridge: the University Press, 597 p., ISBN 0-521-62304-9.
- Heikkilä, J.; Silvén, O.: (1997). A four-step camera calibration procedure with implicit image correction In. : Computer Vision and Pattern Recognittion, IEEE Computer Society Conference on , San Juan, Puerto Rico. 17-19.6 1997, pp. 1106-1112
- Šonka, M.; Hlaváč, V.; Boyle, R.: (2006) Image processing, Analysis and Machine Vision. Thomson, United States of America, ISBN 0-495-24438-4.
- Zhang, Z.: (1998) A flexible new technique for camera calibration. Technical report MSR-TR-98-71. 22 s.
- Zhegyou Z.: (2004) Camera Calibration with One- Dimensional Objects, In : IEEE Transactions on Pattern Analysis and Machine Intelligence, VOL 26, NO 7,
- Bouguet : Complete camera calibration toolbox for Matlab:
http://www.vision.caltech.edu/bouguetj/index.html
Co-authors of this paper is R. Ravas, Slovak University of Technology, Faculty of Electrical Engineering and Information Technology, Ilkovičova 3, 812 19 Bratislava.


